So you’ve got yourself one of Samsung’s new mid-range phones or are planning to do so, either because you love selfies or because you’re looking for a flagship-like experience without paying the price a flagship would command. The Galaxy A8 (2018) and Galaxy A8+ are good choices for people who fall in either camp (or both), as we said in our review.
There’s a lot to do on these phones, from taking beautiful selfies that blur the background to viewing YouTube videos on the immersive 18:5:9 Infinity display, but if you’ve just purchased one, here are a few things you should set up on your A8 or A8+ before doing anything else.
Galaxy A8 (2018) Tips: 11 things to do on a new A8 or A8+
Set up face recognition, register fingerprints
This is something your A8 or A8+ would have suggested when you were going through the initial setup after turning the device on for the first time, but if you skipped it, you should set up your fingerprint and also enable facial recognition. On a security scale, the former is better and the latter is more convenient. But you don’t have to choose and can use both facial recognition and the fingerprint sensor to unlock the phone.
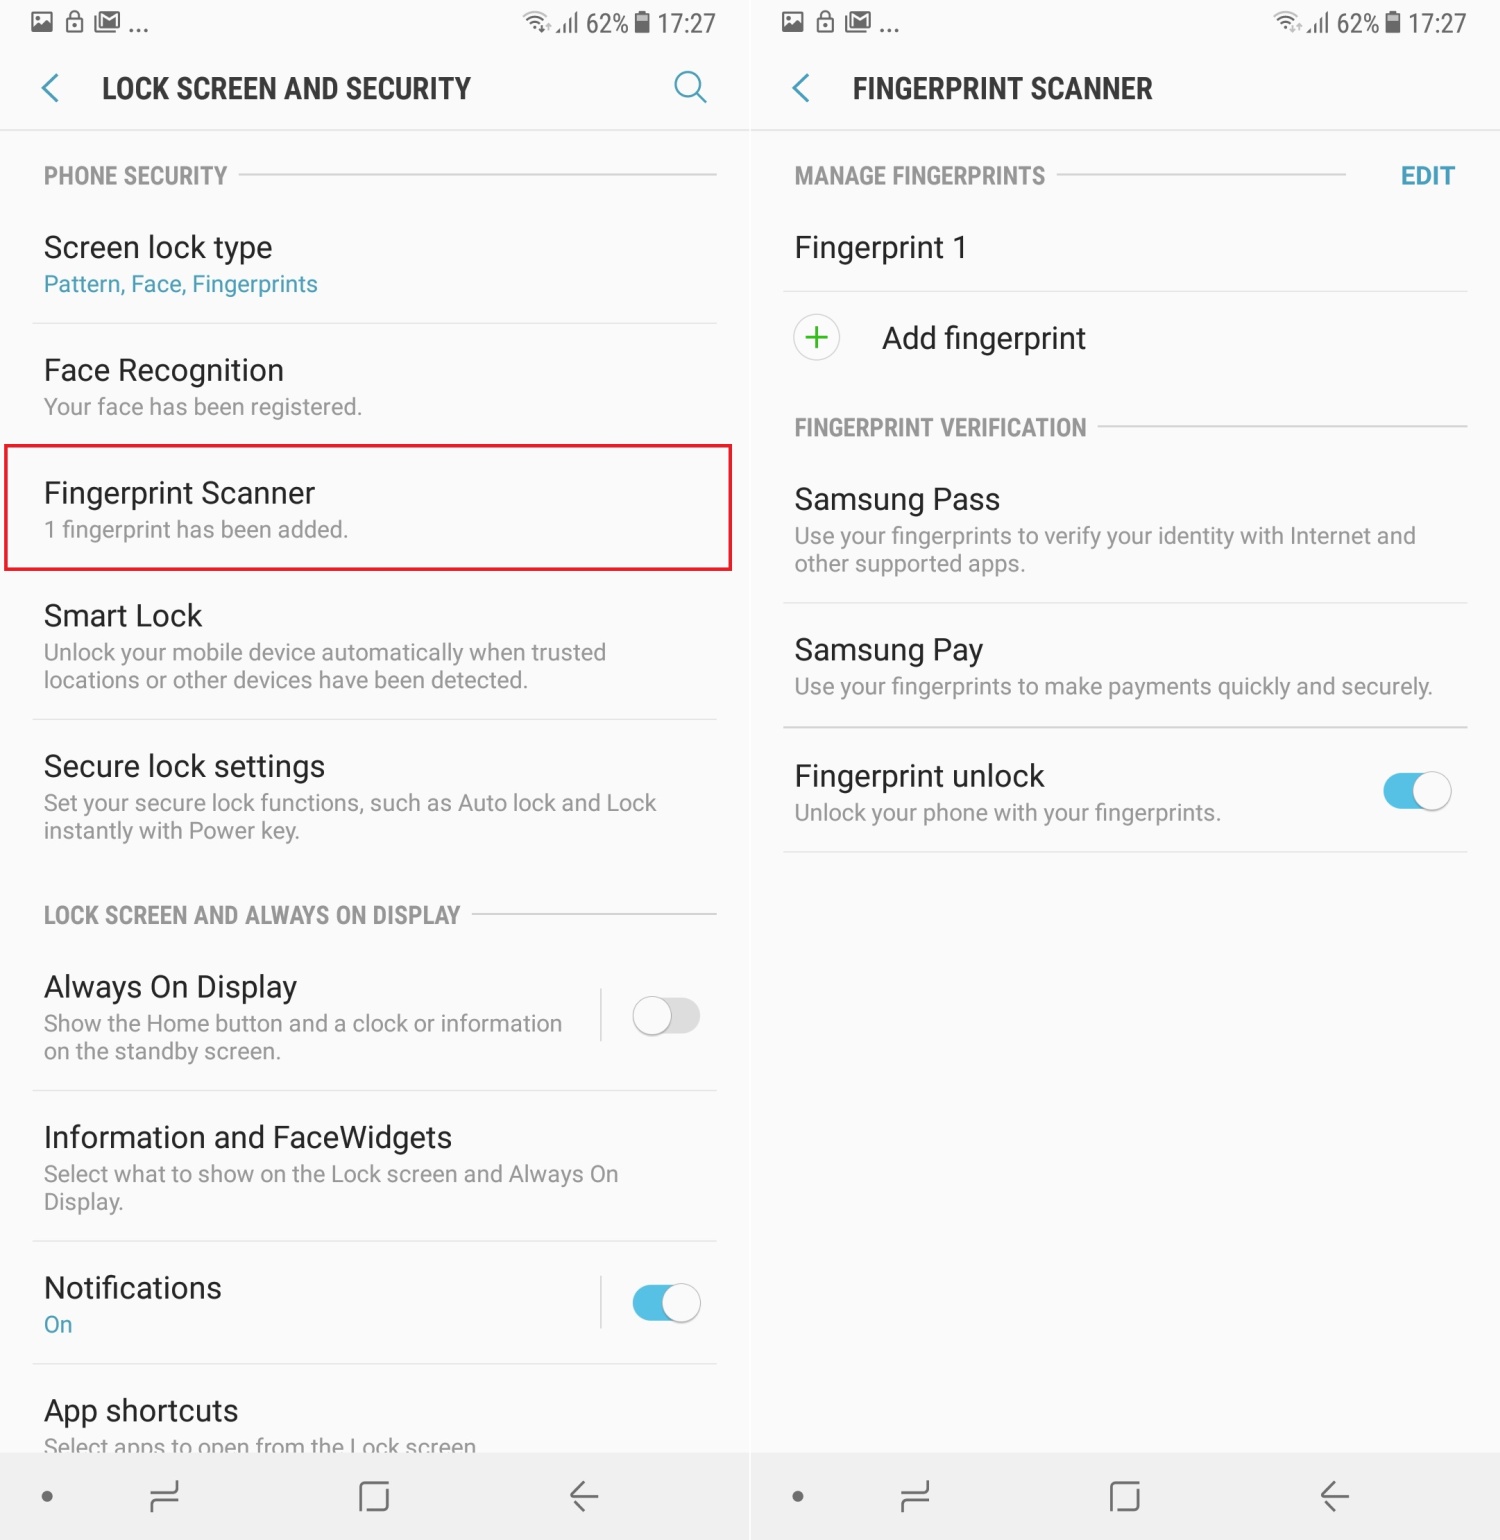
To set up your fingerprint, open the Settings app, tap Lock screen and security, then tap Fingerprint Scanner. You’ll first need to set up a pattern, PIN, or password as an alternative when the fingerprint sensor doesn’t work (or when you can’t pick up the phone to use the rear-mounted fingerprint scanner). Then, simply follow the instructions to register your fingerprint, then select the Turn on option when asked if you want to enable fingerprint unlock.
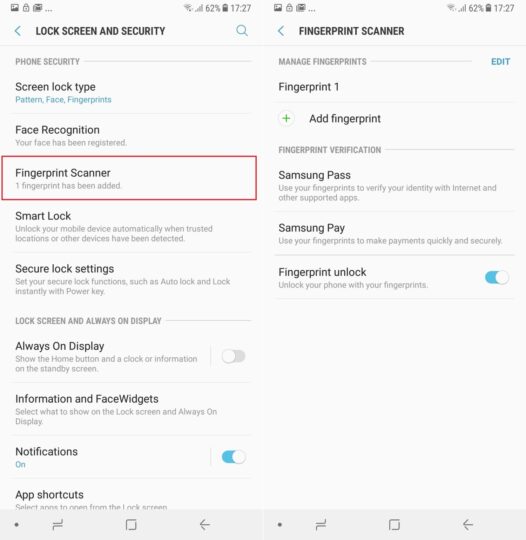
It’s not over yet. Did you know you can add the same finger as a separate fingerprint? This makes the sensor more accurate, as it gets double the fingerprint data for the same finger. To add another fingerprint, you can tap the Add fingerprint option in the Fingerprint Scanner menu, then use the same finger you used earlier. Of course, you can also add another finger, like the index finger on your left hand for when you can’t pick up the phone with your right hand.
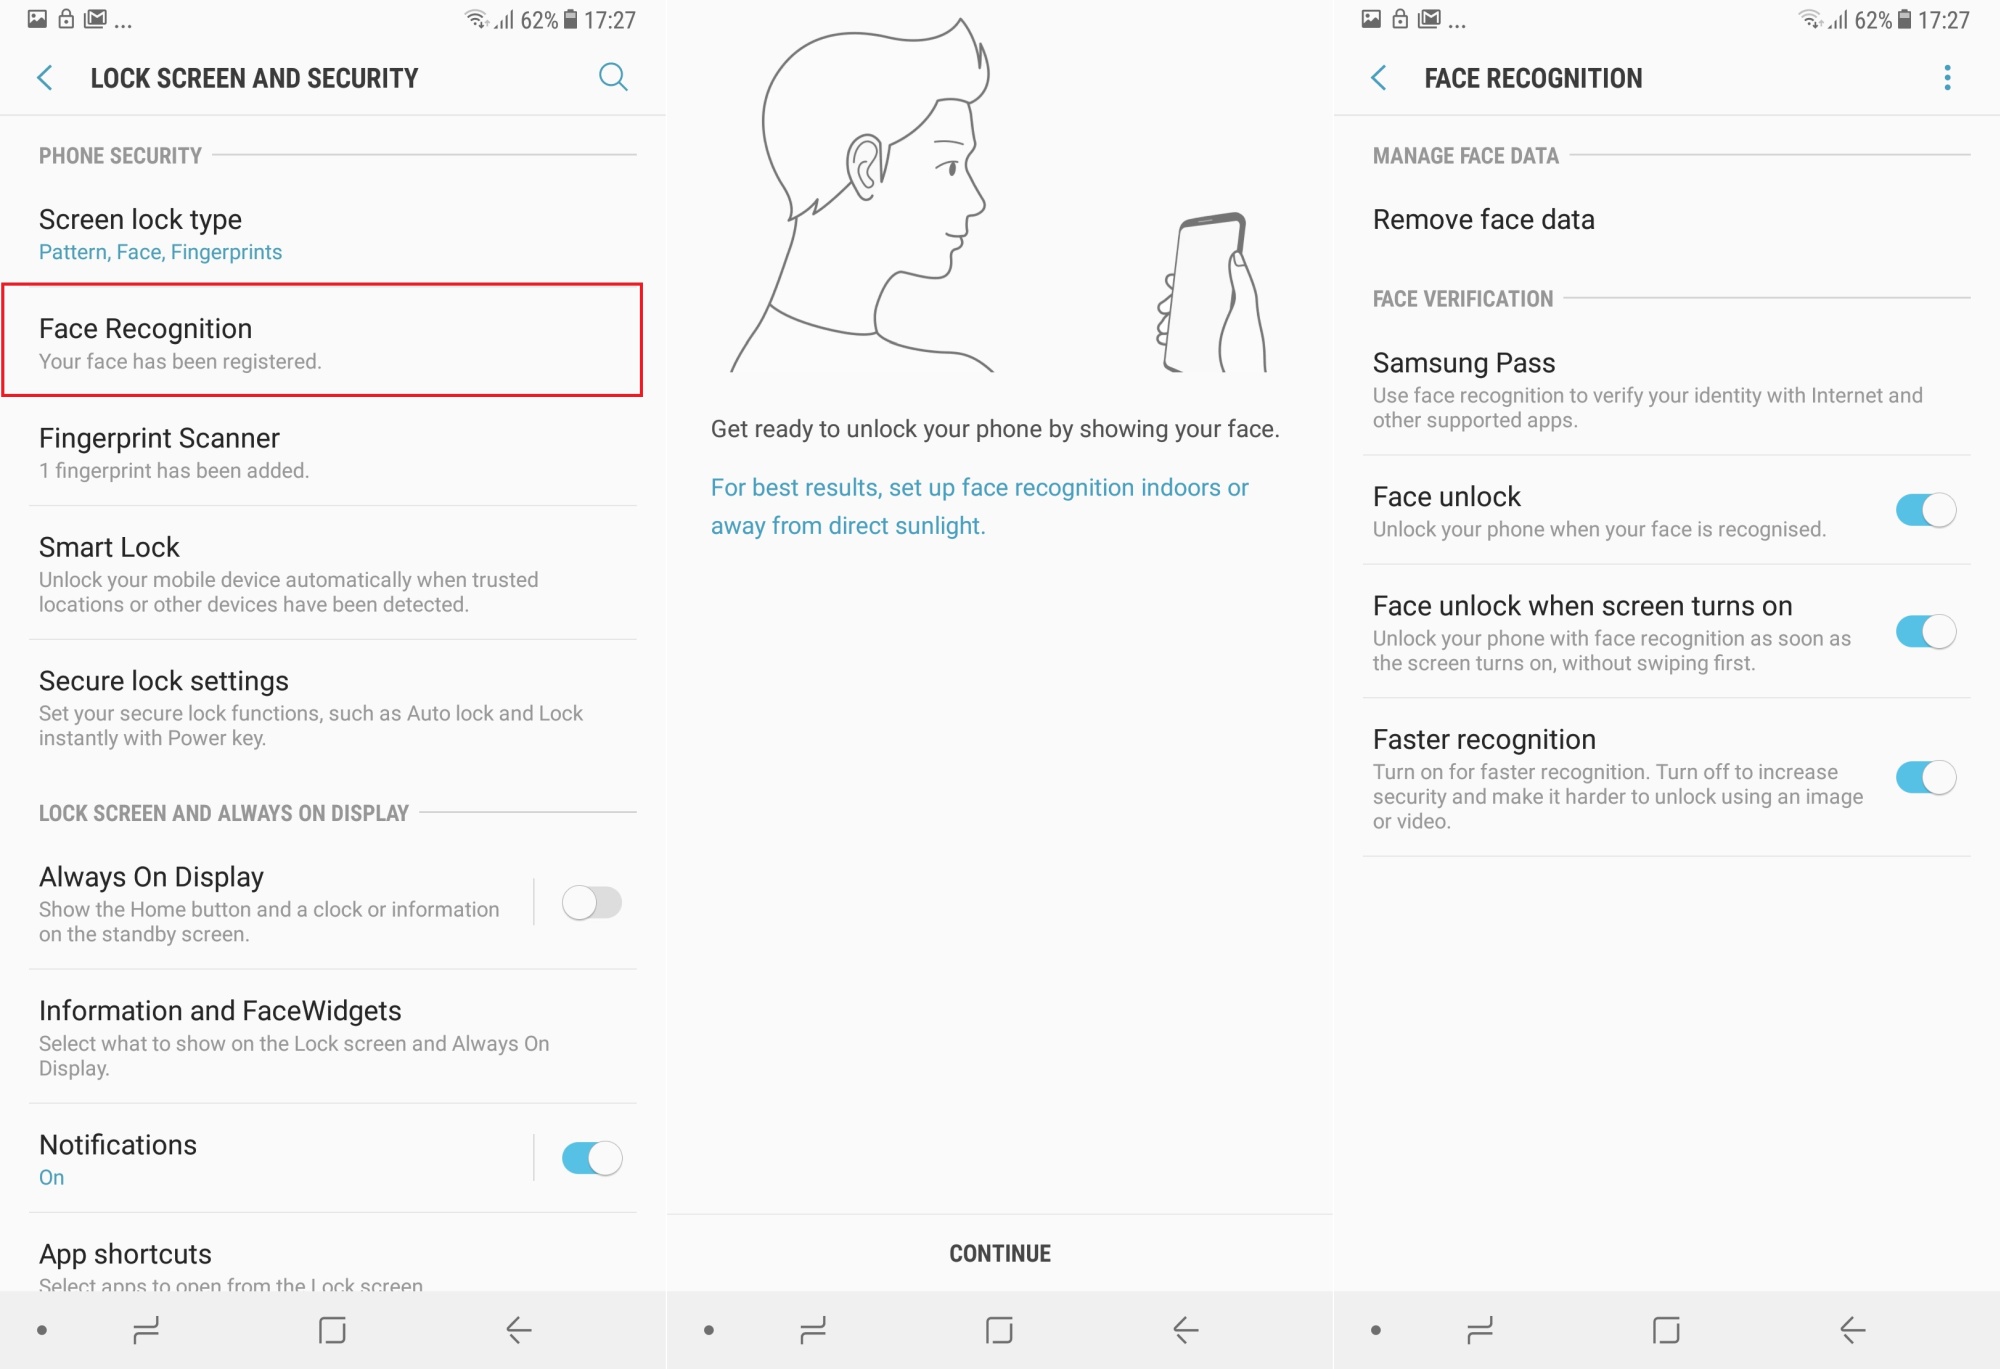
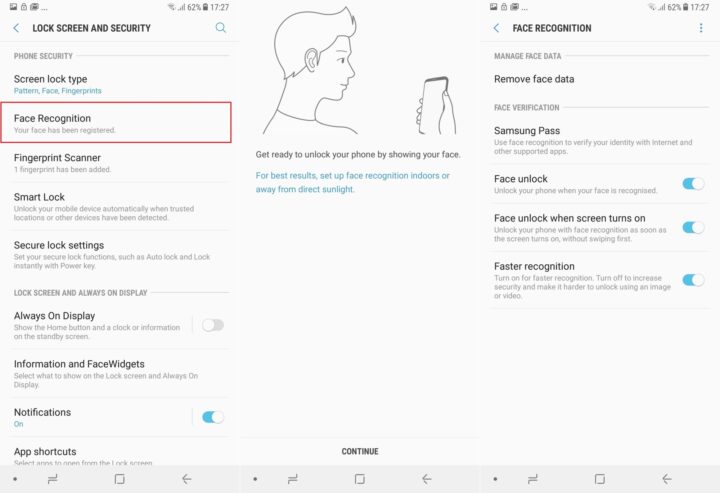
Now, for facial recognition, go into Lock screen and security in the settings and tap Face recognition. Follow the instructions to register your face, tap OK on the next screen to enable facial recognition, then select Turn on when asked if you wish to unlock the device using facial recognition. If you want, you can choose between the phone automatically unlocking when you press the power button to wake the screen up, or waiting for a swipe on the lock screen. This is done in the Face recognition menu. Remember that facial recognition isn’t too secure, as someone can use an image or video of your face to fool the phone into unlocking.
Sign in with your Samsung account
This is another thing that you get asked to do during the initial setup process. A Samsung account can come handy for backing up basic data like call logs, messages, alarms, keyboard dictionary (from Samsung’s stock keyboard app), phone settings, and even your saved cards from Samsung Pay, all of which you can restore on another Samsung device. It’s also required to access the Theme Store.
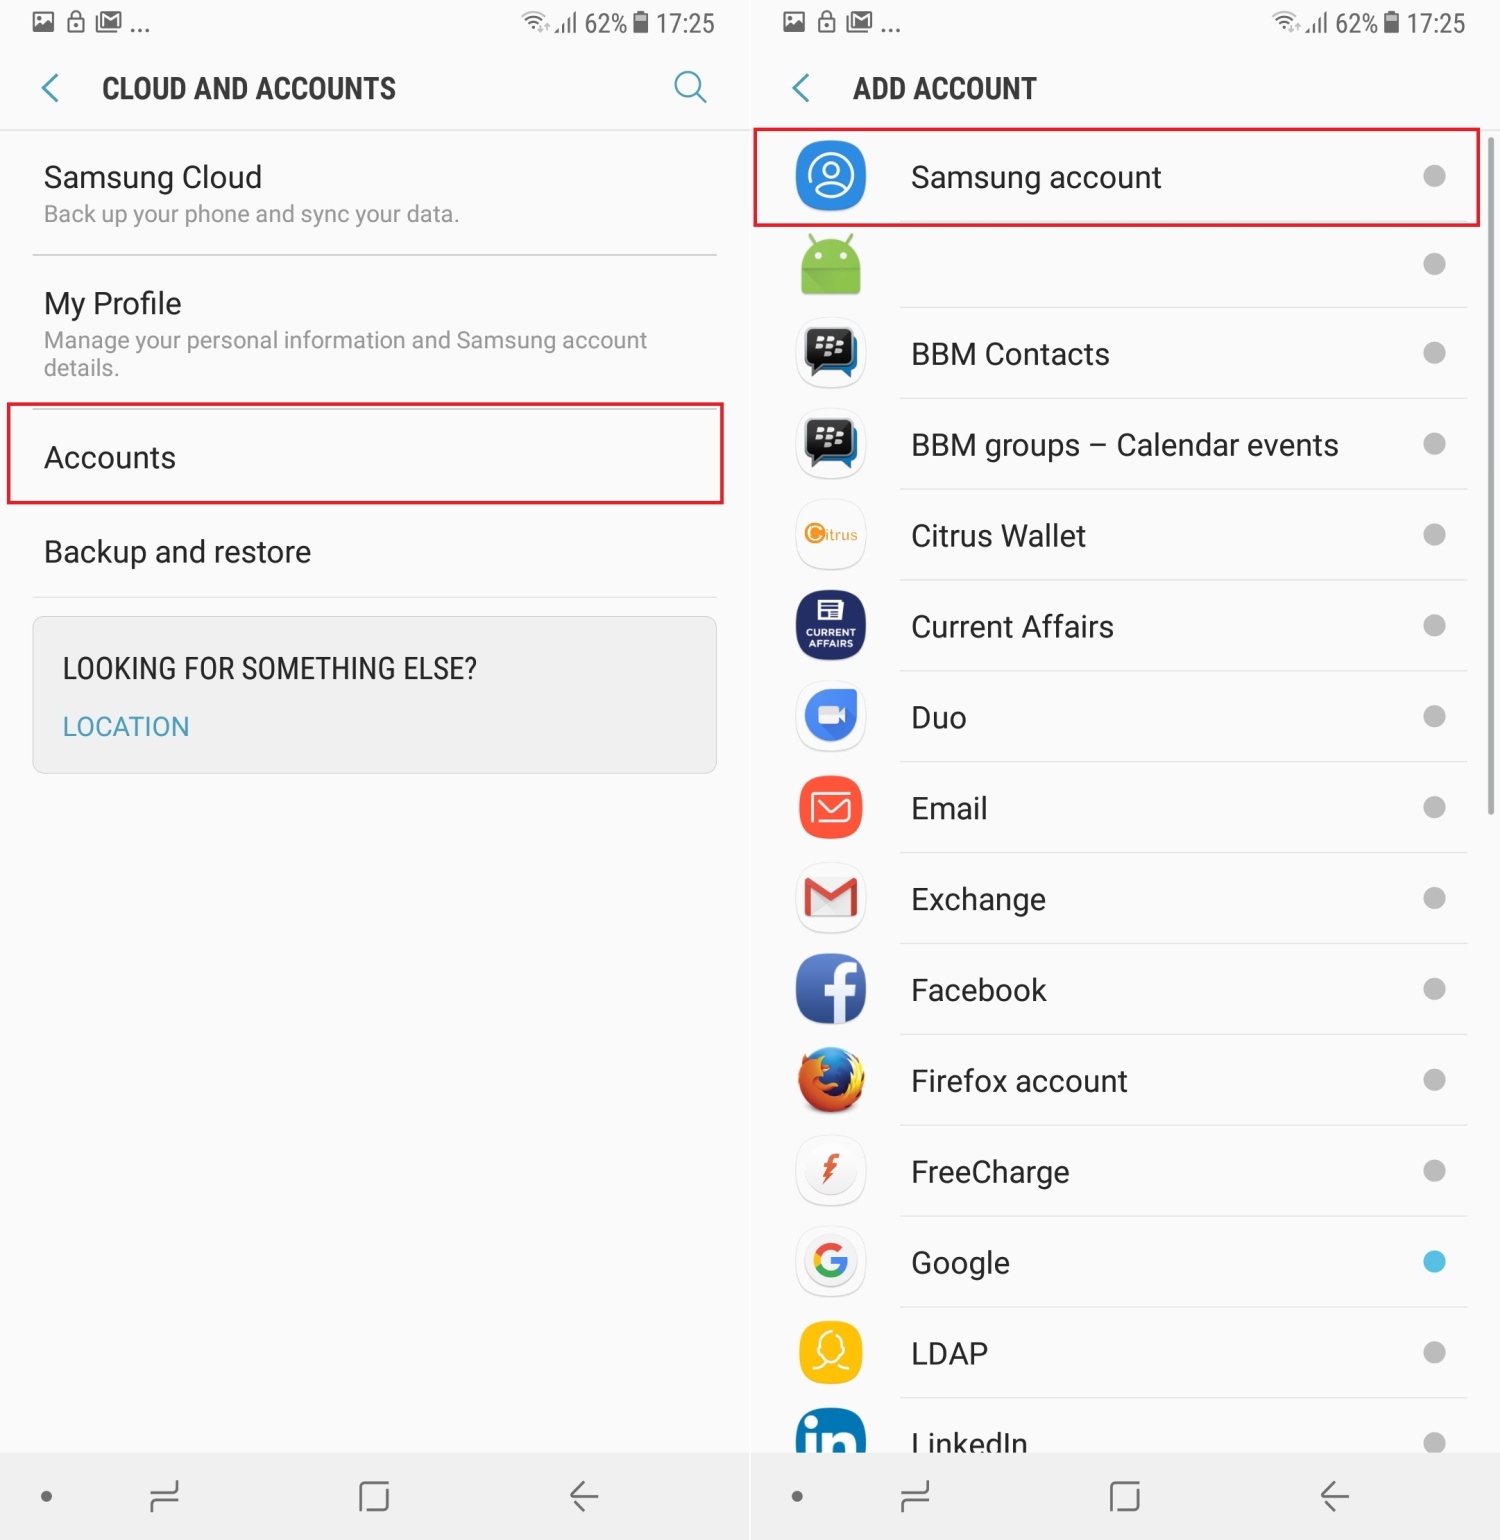
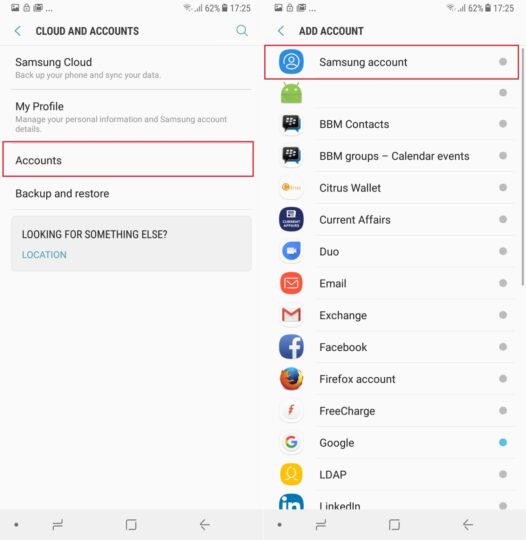
If you skipped setting up your Samsung account earlier, you can do that by tapping the Add account option in the Settings » Cloud and Accounts » Accounts menu and selecting Samsung Account. Follow the instructions to sign in or make a new account if you don’t already have one.
Bonus: Once you have your Samsung account logged in, disable gallery sync to Samsung Cloud from the Settings » Cloud and Accounts » Samsung Cloud menu. Samsung Cloud only offers 15GB of free storage, and you can run out pretty quickly once you build up a library of photos on the device. To backup photos, use Google Photos, which allows free unlimited backup of images up to 16-megapixel resolution. Quality is slightly degraded by Google Photos, but the difference is usually negligible considering the unlimited storage Google is offering you. Of course, if you use a microSD card, you can always copy your images to a PC by connecting the phone via the USB Type-C cable in the box.
Enable the trusty app drawer button
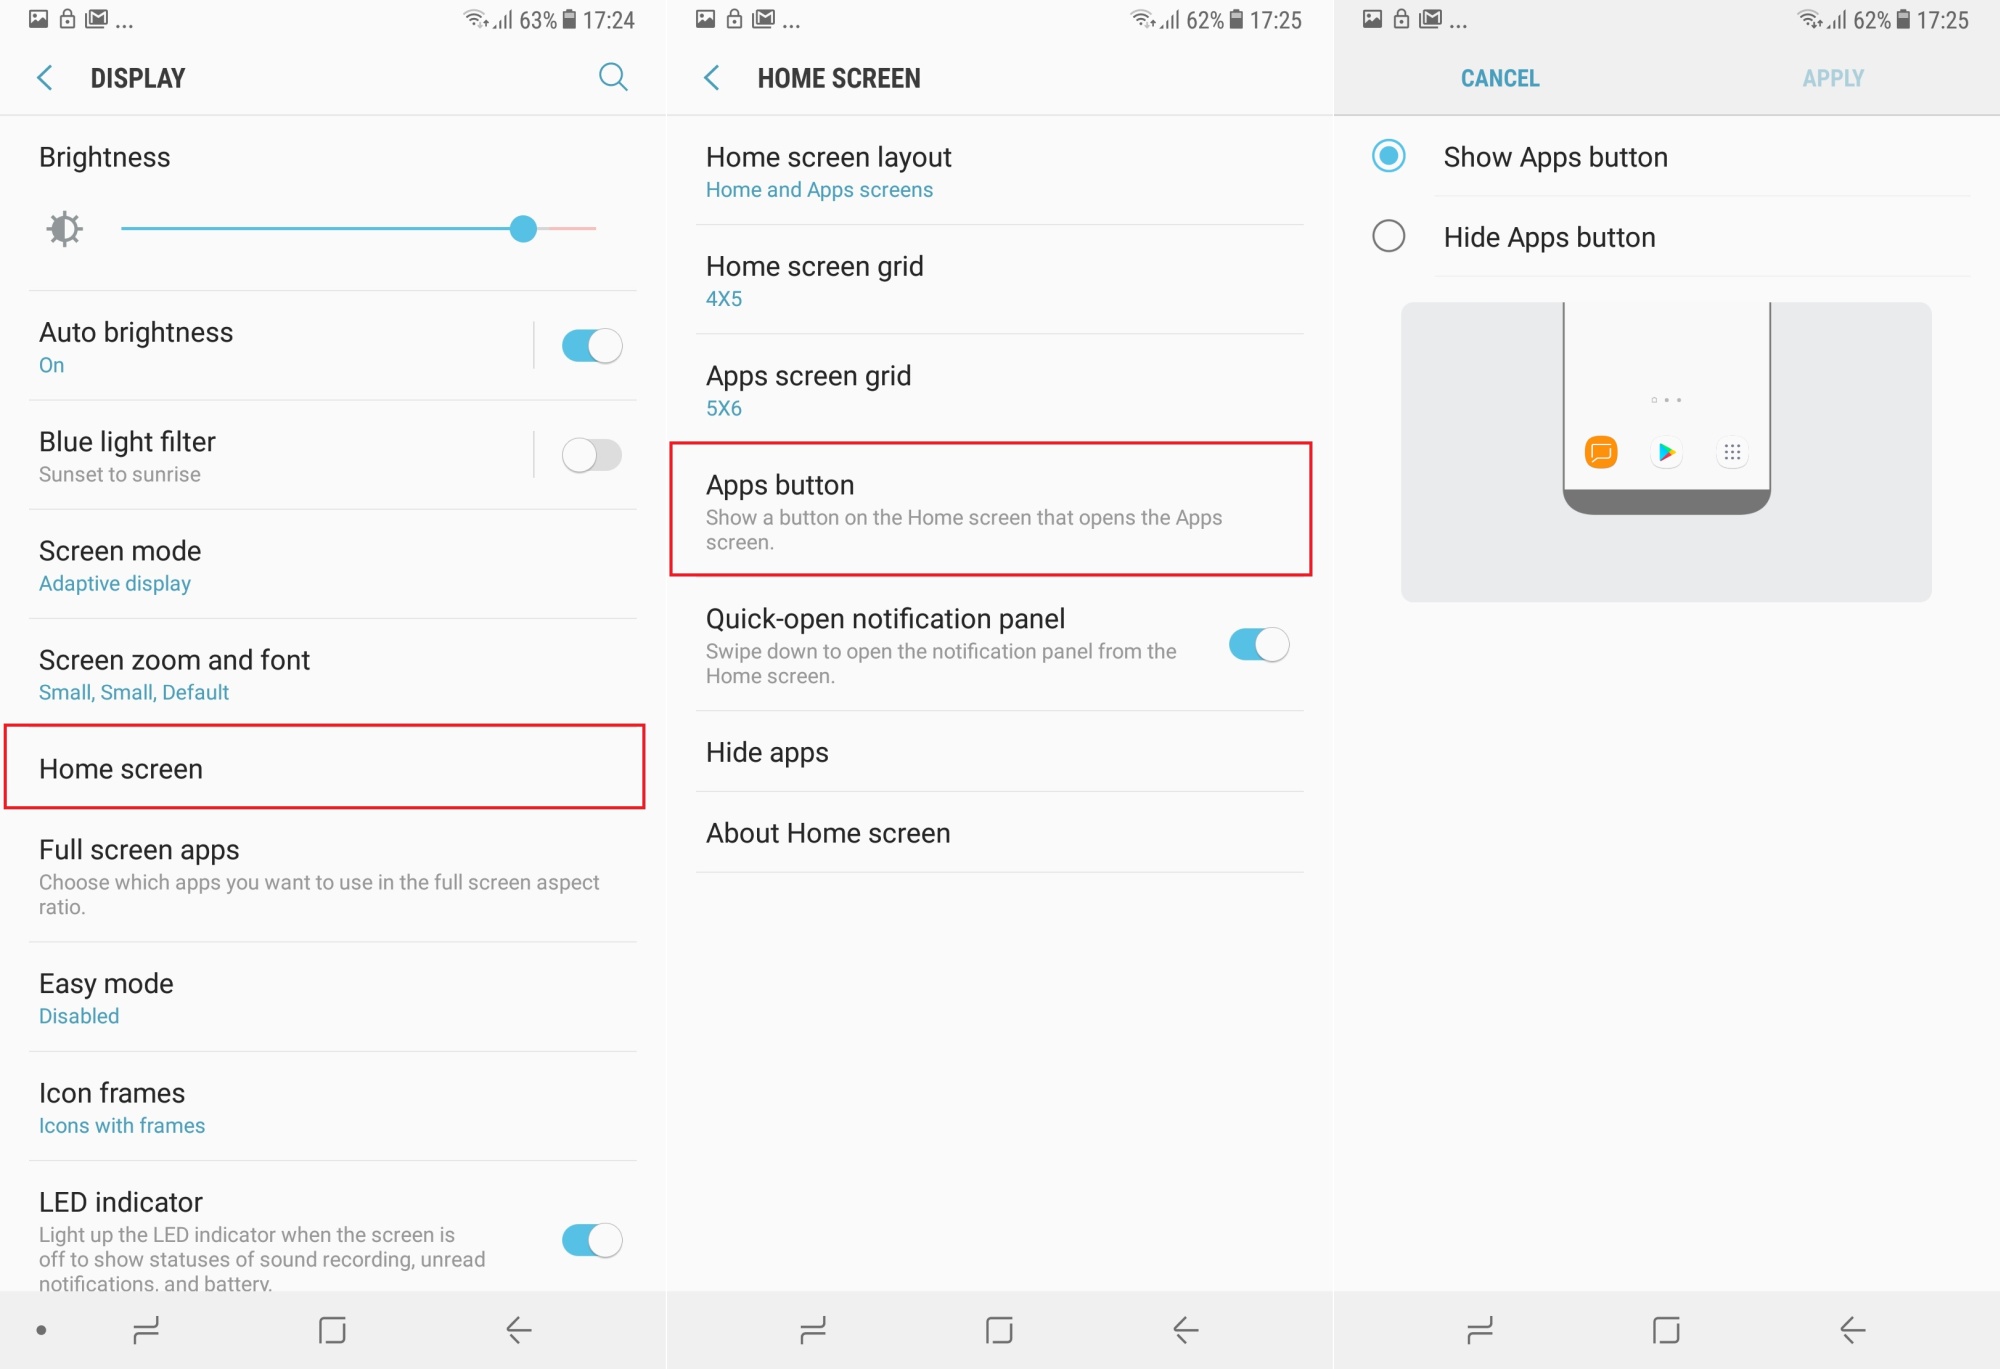
By default, on the latest versions of Samsung’s software (dubbed Samsung Experience), accessing the list of apps installed on the device is done by swiping up or down on the home screen. If you prefer the traditional button in the home screen dock (the bottom-most row of icons) for accessing the app drawer, you can enable it in the Home screen section of the Display menu in the phone’s settings. Here, tap Apps button, then select the Show Apps button option to enable the app drawer button on the home screen. This doesn’t disable the swipe gestures, so you can still swipe up or down to access the app drawer in addition to using the button.

Bonus: You can also use the swipe down gesture on the home screen to open the notification panel. Enable the gesture by turning on the Quick-open notification panel option in the Home Screen section of the display settings. If this option is enabled, the app drawer can only be brought up by swiping up on the home screen.
Set up Bixby Home… Or ignore it
The A8 and A8+ come with Bixby Home, a basic implementation of Bixby that doesn’t require a dedicated hardware button. Bixby Home is a one-stop destination where you get recommendations based on your usage patterns. Into Facebook too much? You’ll get Facebook notifications here. If the phone sees that you stop using it for hours on end at a particular time, it will offer to set a reminder to tell you that it’s time to sleep at that time. Information such as upcoming schedules and the day’s weather are also shown in Bixby Home, in addition to things like YouTube and music recommendations.
If you don’t want to use Bixby Home, there’s nothing you need to do other than never swipe right on the home screen. If you want to see what it’s about, you can access it by swiping right on the first page of the home screen. The first time you do it, you’ll need to sign in with your Samsung account and accept a couple of terms and conditions. Bixby Home will then start working on putting together recommendations and other data as you go about using your phone. It takes a few days to become truly useful, but feel free to check back on Bixby Home from time to time.
Enable floating camera button (and take a selfie)
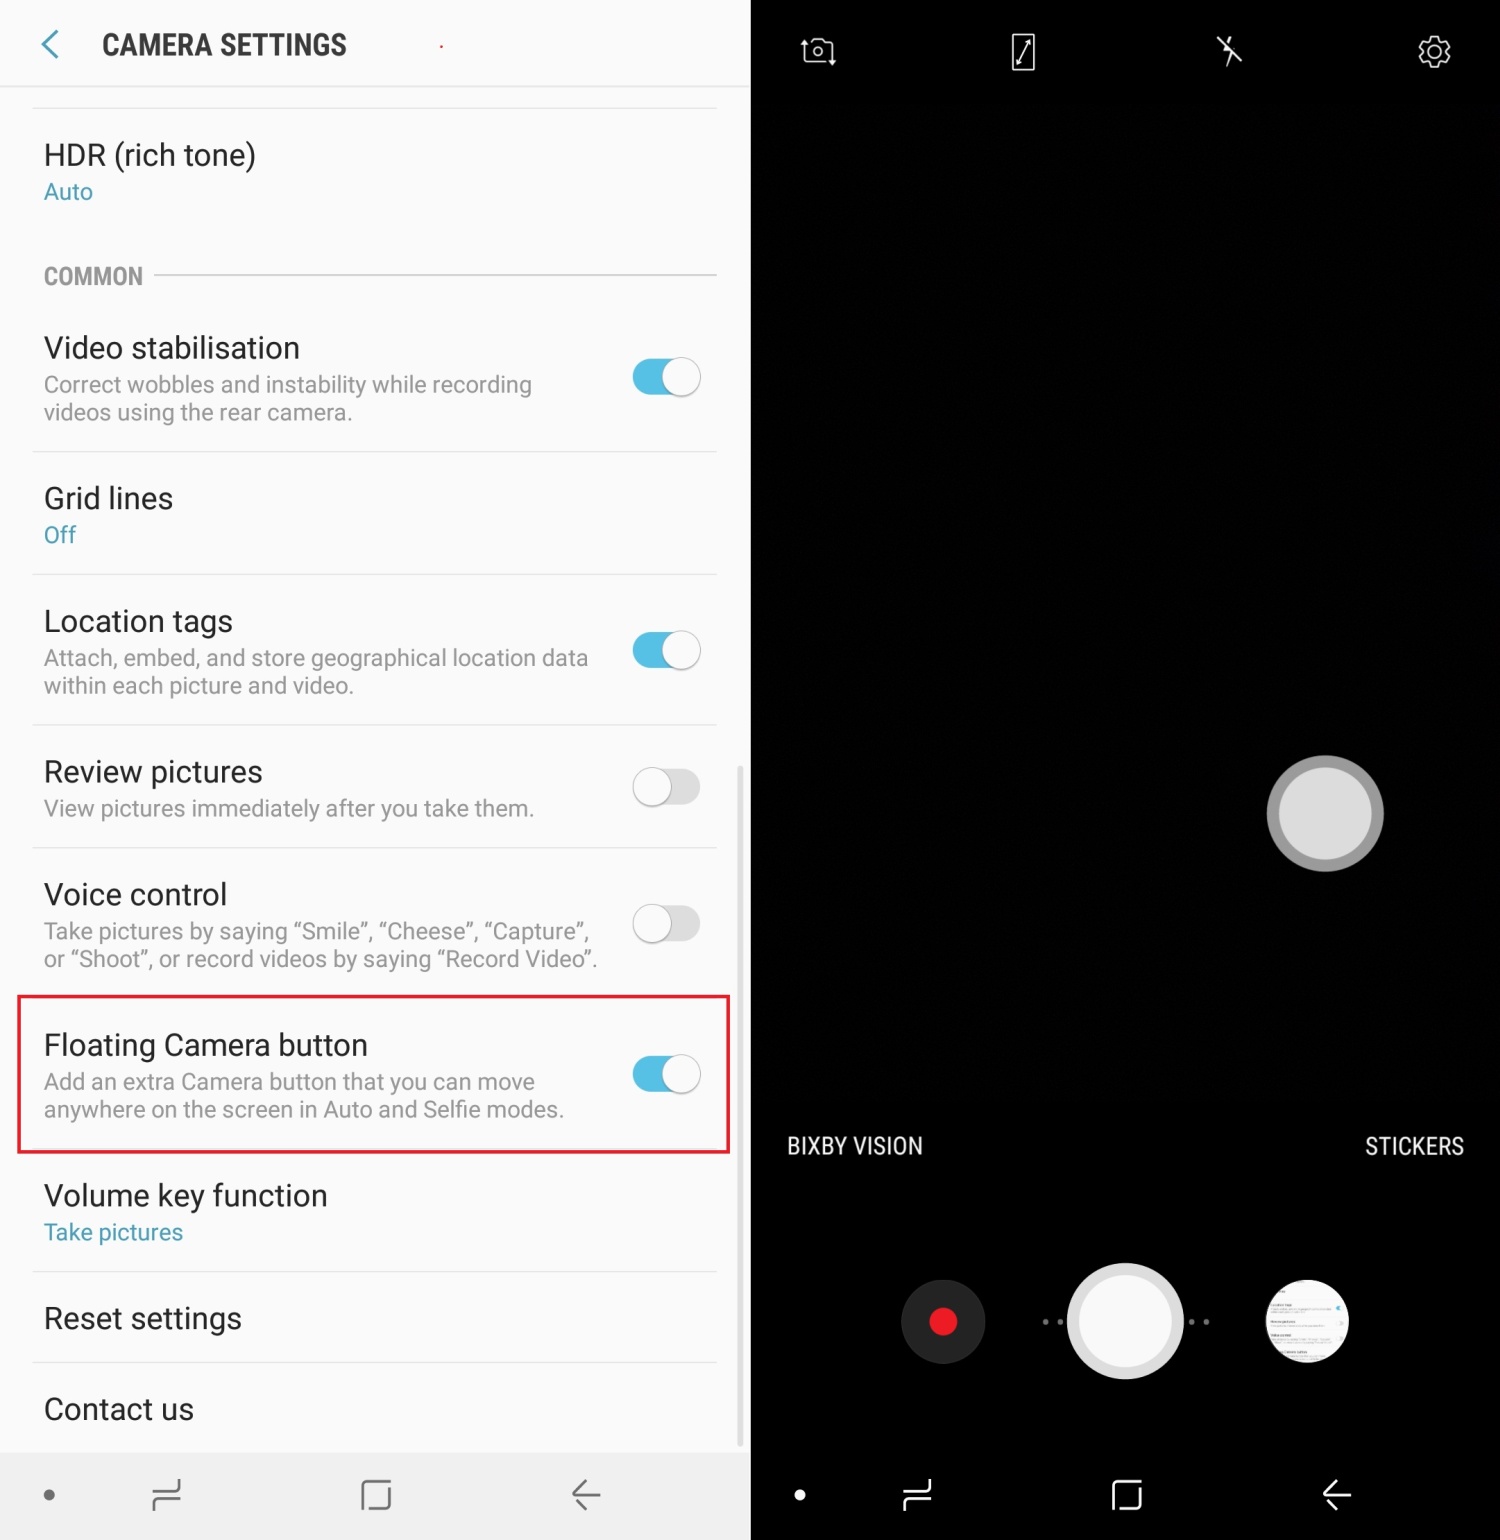
The floating camera button was introduced with the 2017 Galaxy A series phones. It lets you have a second shutter button inside the camera app, one that can be moved anywhere on the screen so you can easily take photos without reaching for the volume buttons or the default shutter button, which can be hard to do at times. To enable the floating button, open the camera app, tap the settings button (the cog icon at the top right of the screen), then scroll down to find the Floating Camera button option. Once enabled, you’ll see the second shutter button inside the camera app, and you can just drag it to move it where you like.

Bonus: If you’re in the camera app and haven’t already taken a Live Focus selfie, well, you can do it now. Swipe up in the camera app to switch to the front camera (skip this if you’re already in the front camera), tap the Live Focus button, position the phone in front of you, wait for it to say Live Focus ready, then tap the shutter button.
Customize on-screen navigation key layout
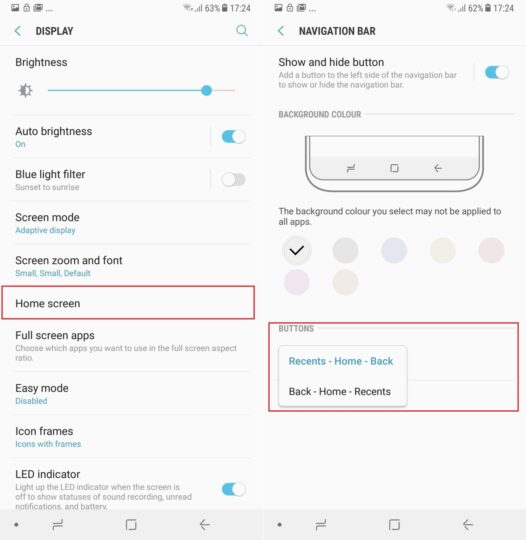
If you’re moving from a non-Samsung phone that had stock Android’s virtual on-screen back, home, and multitasking/recent apps keys, you might not be comfortable with Samsung’s setup, which has the back key on the right of the home key. This is what we prefer, as the back key is used far more option than the recent apps key and is easier to reach on Samsung’s default setup, but that doesn’t mean you have to agree. If you want the stock Android arrangement, you can switch things up in the Settings » Display » Navigation bar » Buttons layout menu.
Bonus: If you don’t want to see the on-screen navigation bar at all times (handy for increasing the screen estate available to apps), you can enable a small circular icon next to the navigation keys. This icon can be double tapped to make the navigation bar disappear unless called upon with a swipe up from the bottom of the screen. Another double tap, and the navigation bar will show up at all times. Enable this icon from the navigation bar settings by toggling the Show and hide button.
Customize quick toggles
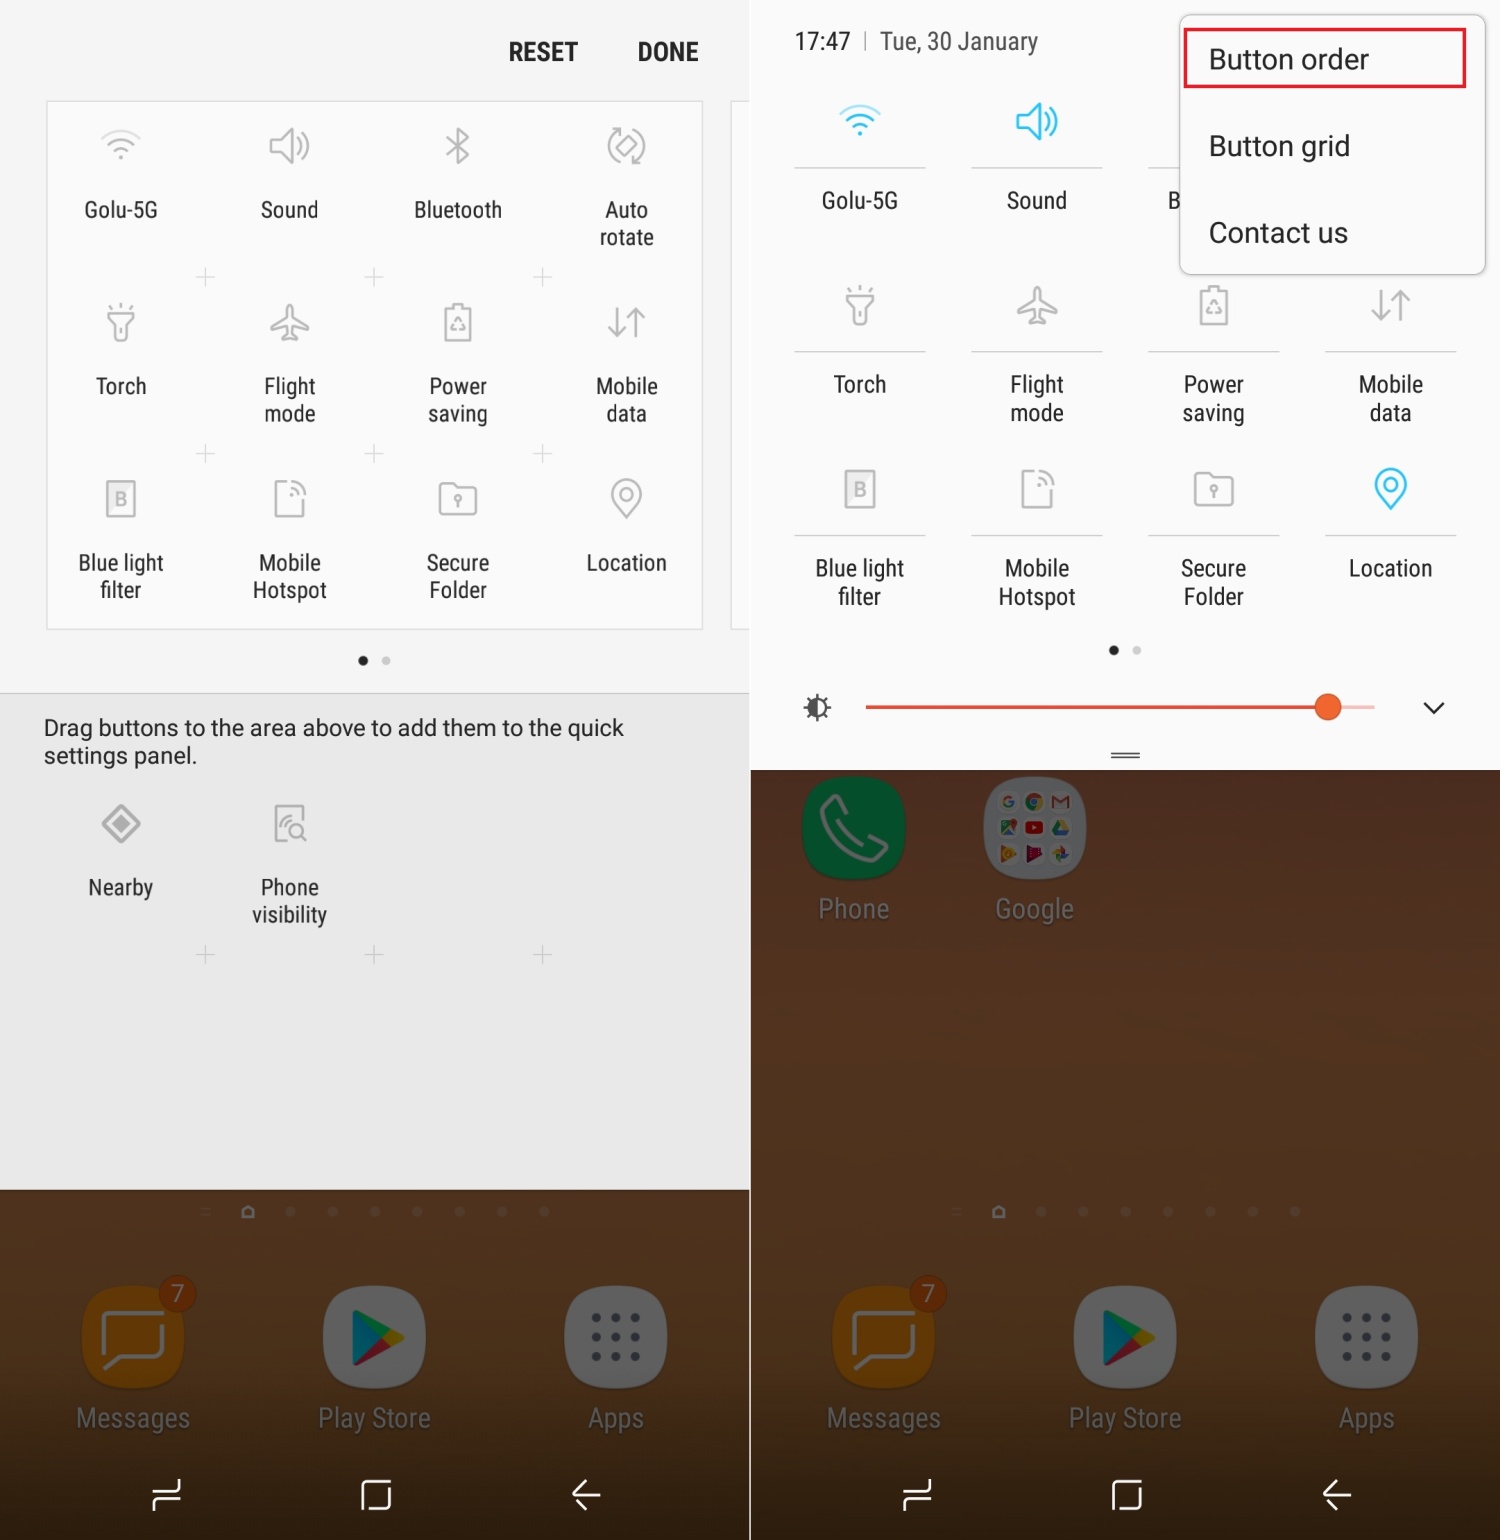
There are six default quick toggles that you see when you swipe down to open the notification shade, but some of these, like the Wi-Fi or airplane mode toggles, aren’t frequently used by most folks. But you can easily customize the quick toggles to see options that you would use more often. To do so, drag down the notification shade, then expand the quick toggles with another down swipe to see all the available options. Then, tap the three-dot button on the top right, then select Button order. Now, press and hold toggles to move them to the desired locations, then tap Done at the top right of the screen. The first six toggles are what you see by default, so you can add the important toggles (like the flashlight toggle) in these positions for quicker access.

Bonus: You can also make the display brightness slider visible in the primary notification panel, right below the six quick toggles. By default, it is accessed by expanding the full quick toggles menu. To change this, swipe down twice from the top of the screen to expand the quick toggles menu, then tap the down-pointing arrow next to the brightness slider. Here, enable the Show control on top option to always see the brightness slider in the main notification shade.
Set up blue light filter
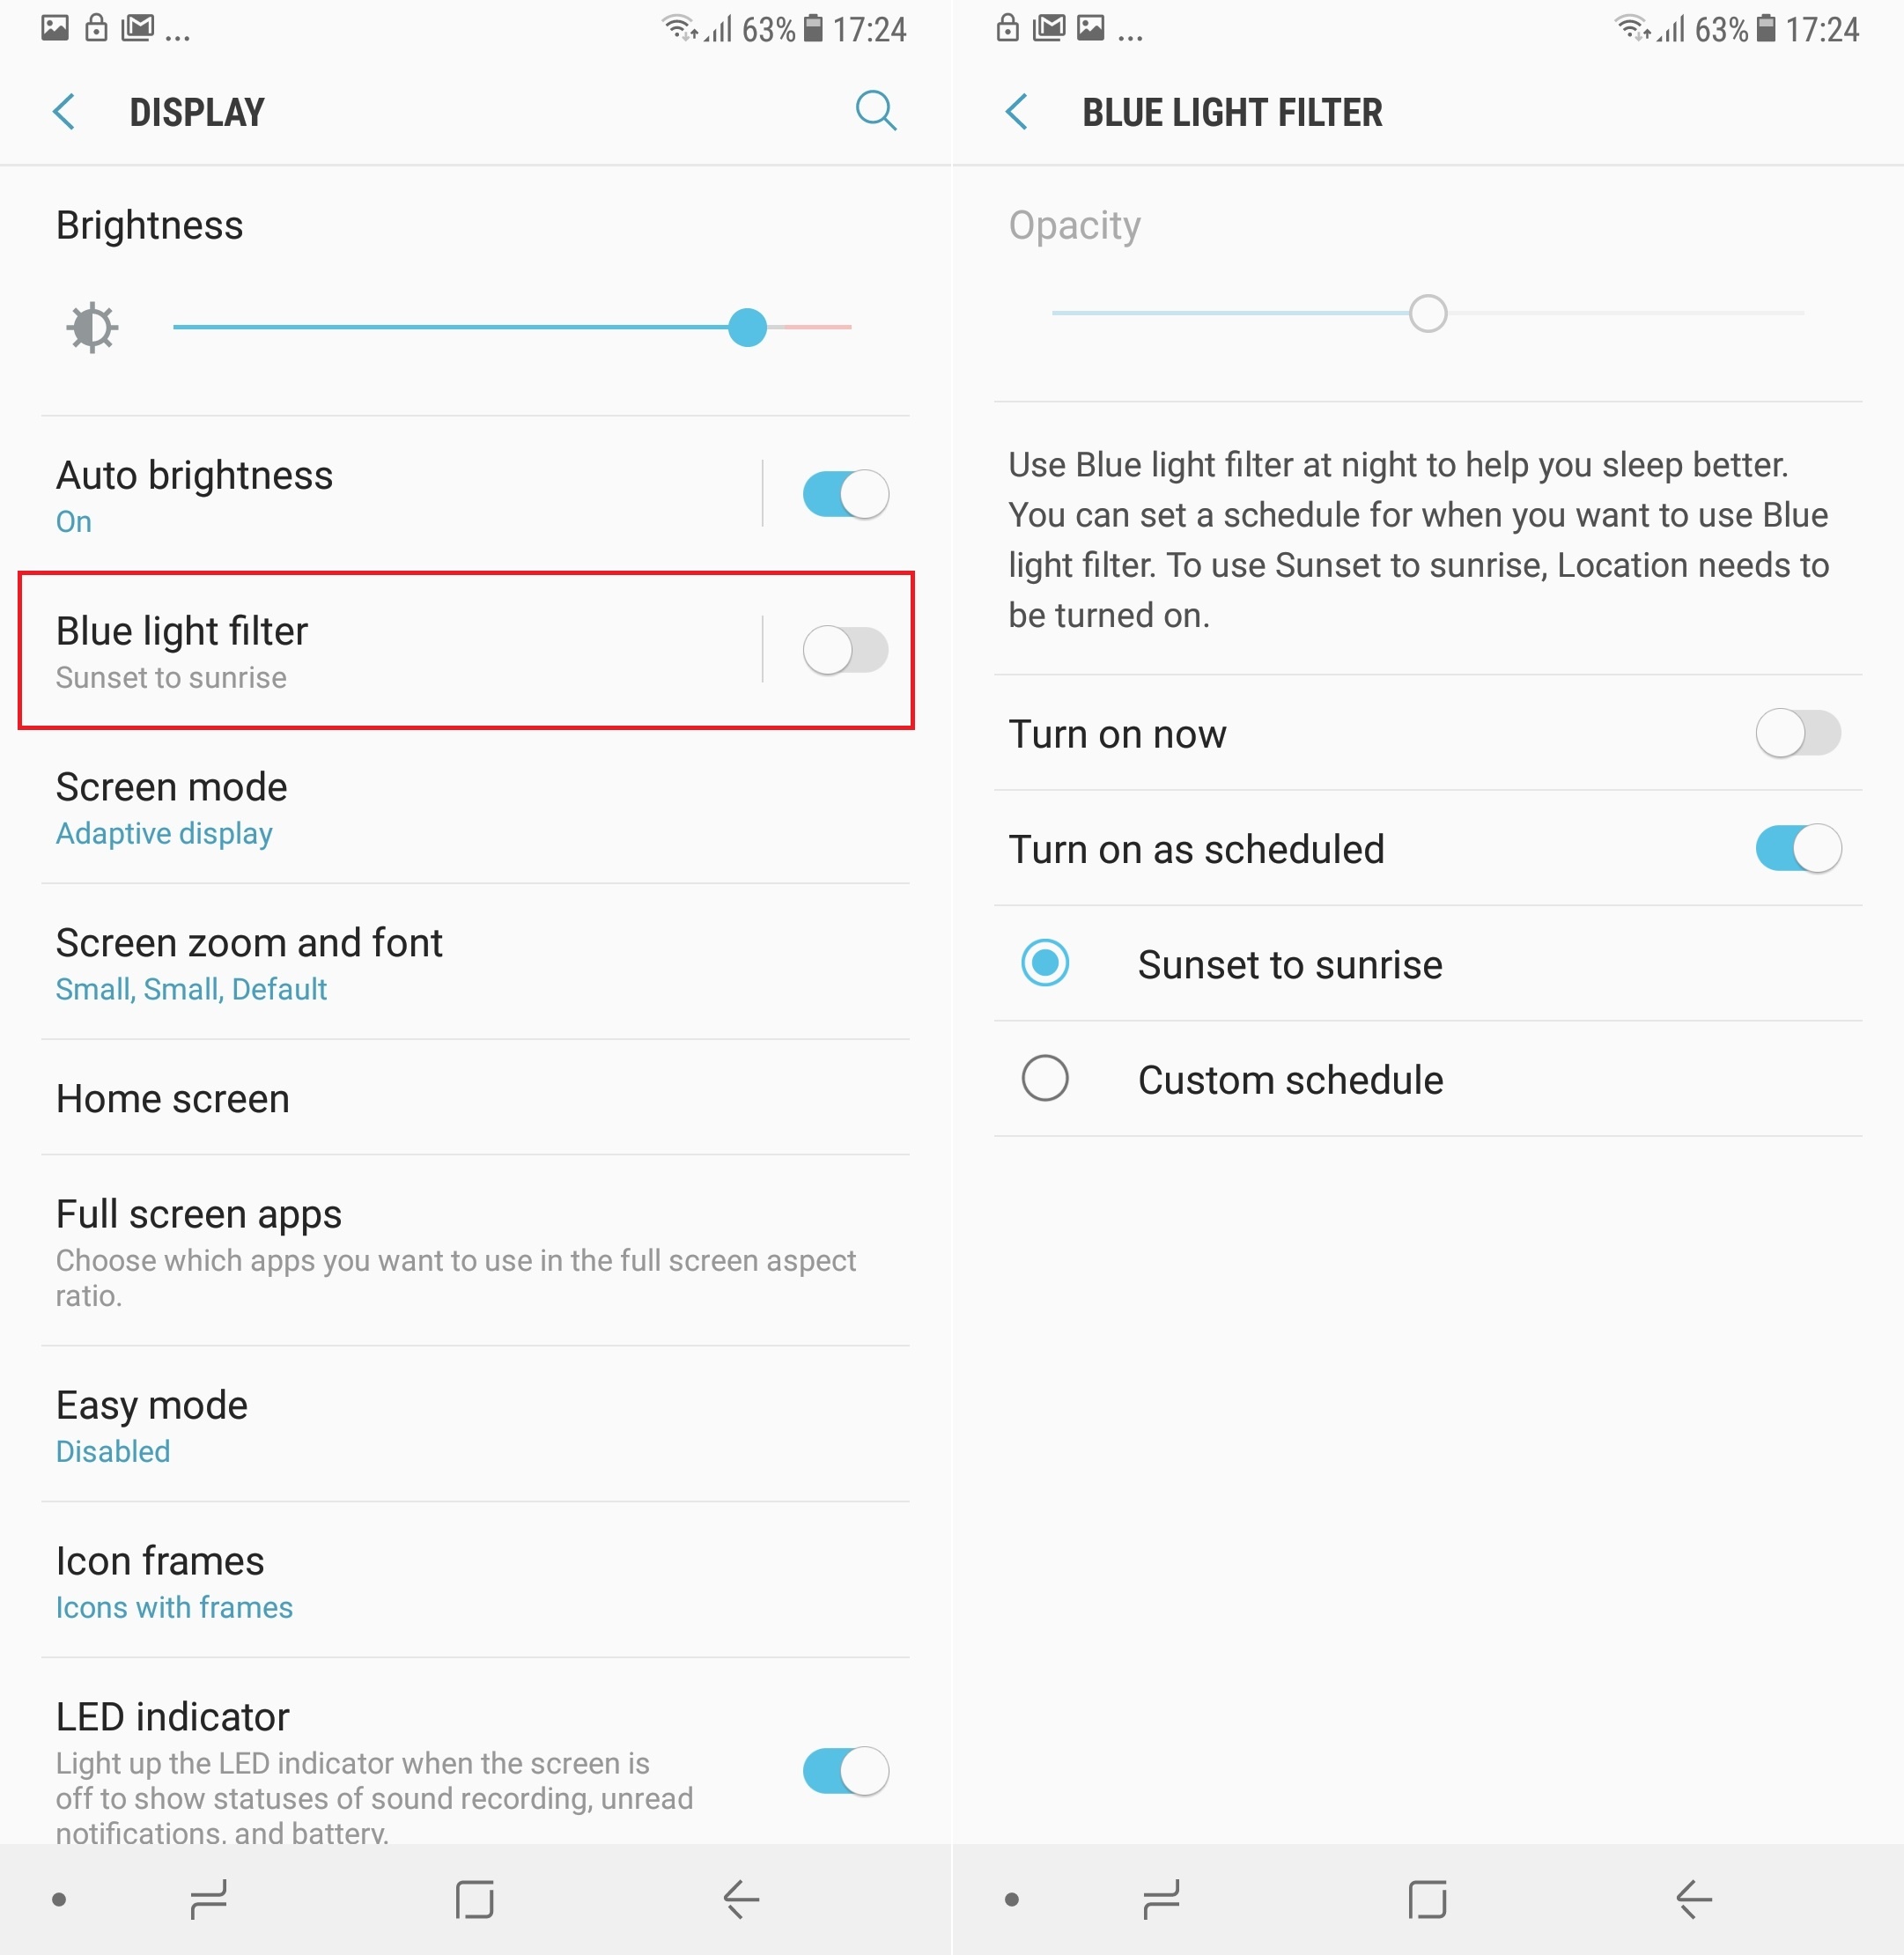
If you’re one to keep staring at your smartphone until you fall asleep from exhaustion, using a blue light filter on the display is recommended. Blue light emitted by electronic displays can make it hard for the brain to create the chemical that signals your body that it’s time to sleep. Samsung phones now come with a blue light filter option built in, and you can set it up to be automatically enabled at a certain time of the day. It can also be toggled on and off at will by using the blue light filter toggle in the quick toggles.
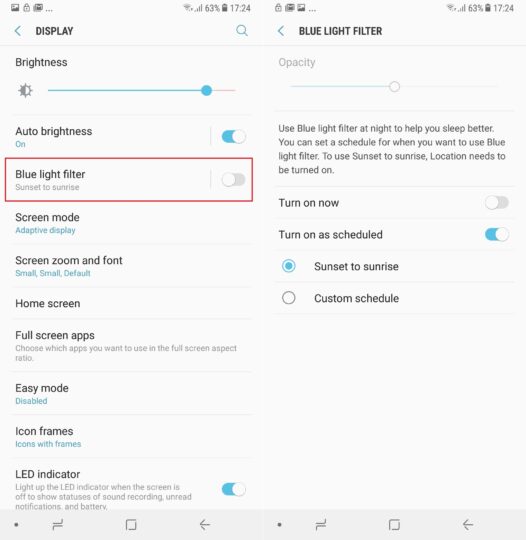
To set it up, go into Settings » Display and tap Blue light filter. Here, enable the Turn on as scheduled option, then allow location access to the blue light filter. This will allow the phone to automatically enable the filter at sunset and disable it at sunrise. You can also set a custom schedule based on when you go to sleep and wake up.
Bonus: You can also change the display mode to make the colors on screen look more natural, although that takes away from the beauty of AMOLED displays. To change display mode, use the Screen mode option in the display settings. You can also change the color tone of the screen here, as long as you stick to the default Adaptive display mode. Warm is for redder whites and cool is for bluer whites; take your pick, or keep things neutral.
Set up Samsung Pay
Samsung Pay, if available in your country, is the best mobile payment service out there, and you should set it up on your A8 or A8+. To do so, open the Samsung Pay app from the app drawer, then follow the instructions to sign in to your Samsung account and add your cards (you might need to update the app the first time you run it). Once you’ve added a card, you can access Samsung Pay from the home screen or lock screen by swiping up from the bottom of the display; the same gesture works for accessing Samsung Pay when the phone is locked and the screen is off, so it’s always at your beck and call.
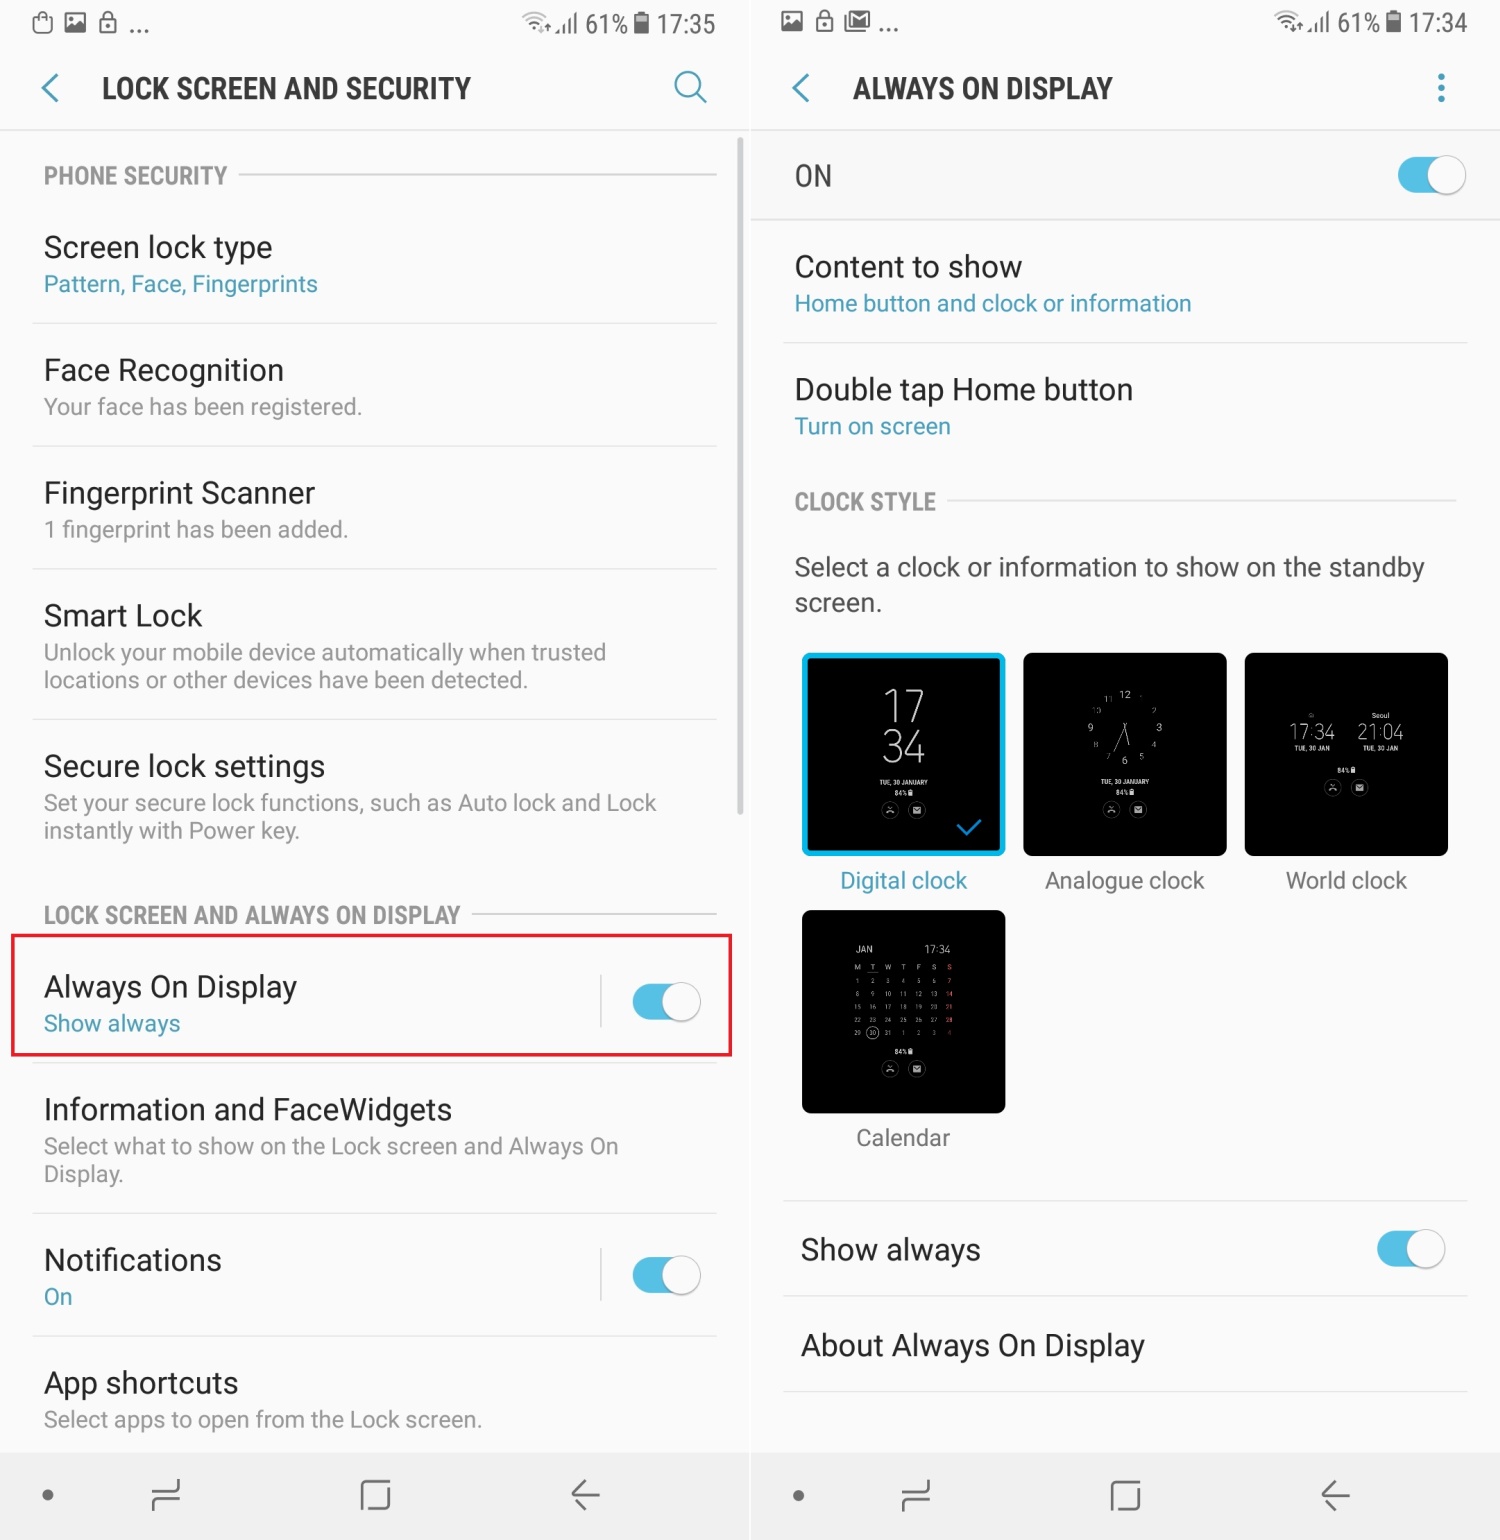
Customize Always On Display
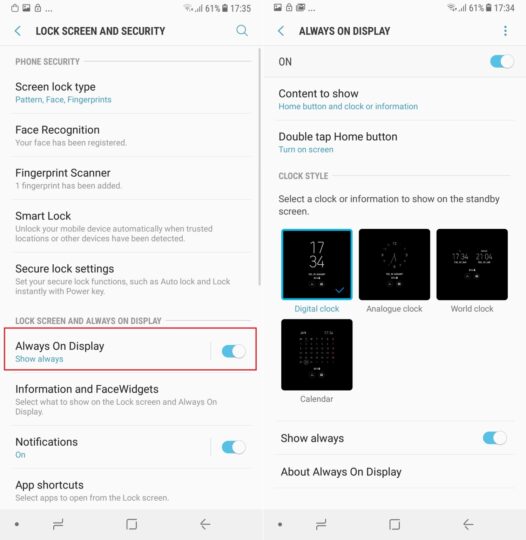
Always On Display (AOD) is a handy feature for seeing the time and notifications on the phone without ever waking it up, and you can customize it to suit your needs. One important AOD feature is the option to show the home button and double tap it to wake the screen up. You can also decide if you want to see only the home button, or see the clock and other information as well. AOD can be set to be enabled at certain times instead of always showing up, and you can also choose from various clock styles.
To customize AOD, open the phone’s settings, go into Lock screen and security, then tap Always On Display. Change the required settings here to modify AOD to your liking. Remember that you can also disable AOD completely to save battery life or toggle it at your whim using its quick toggle in the notification shade.
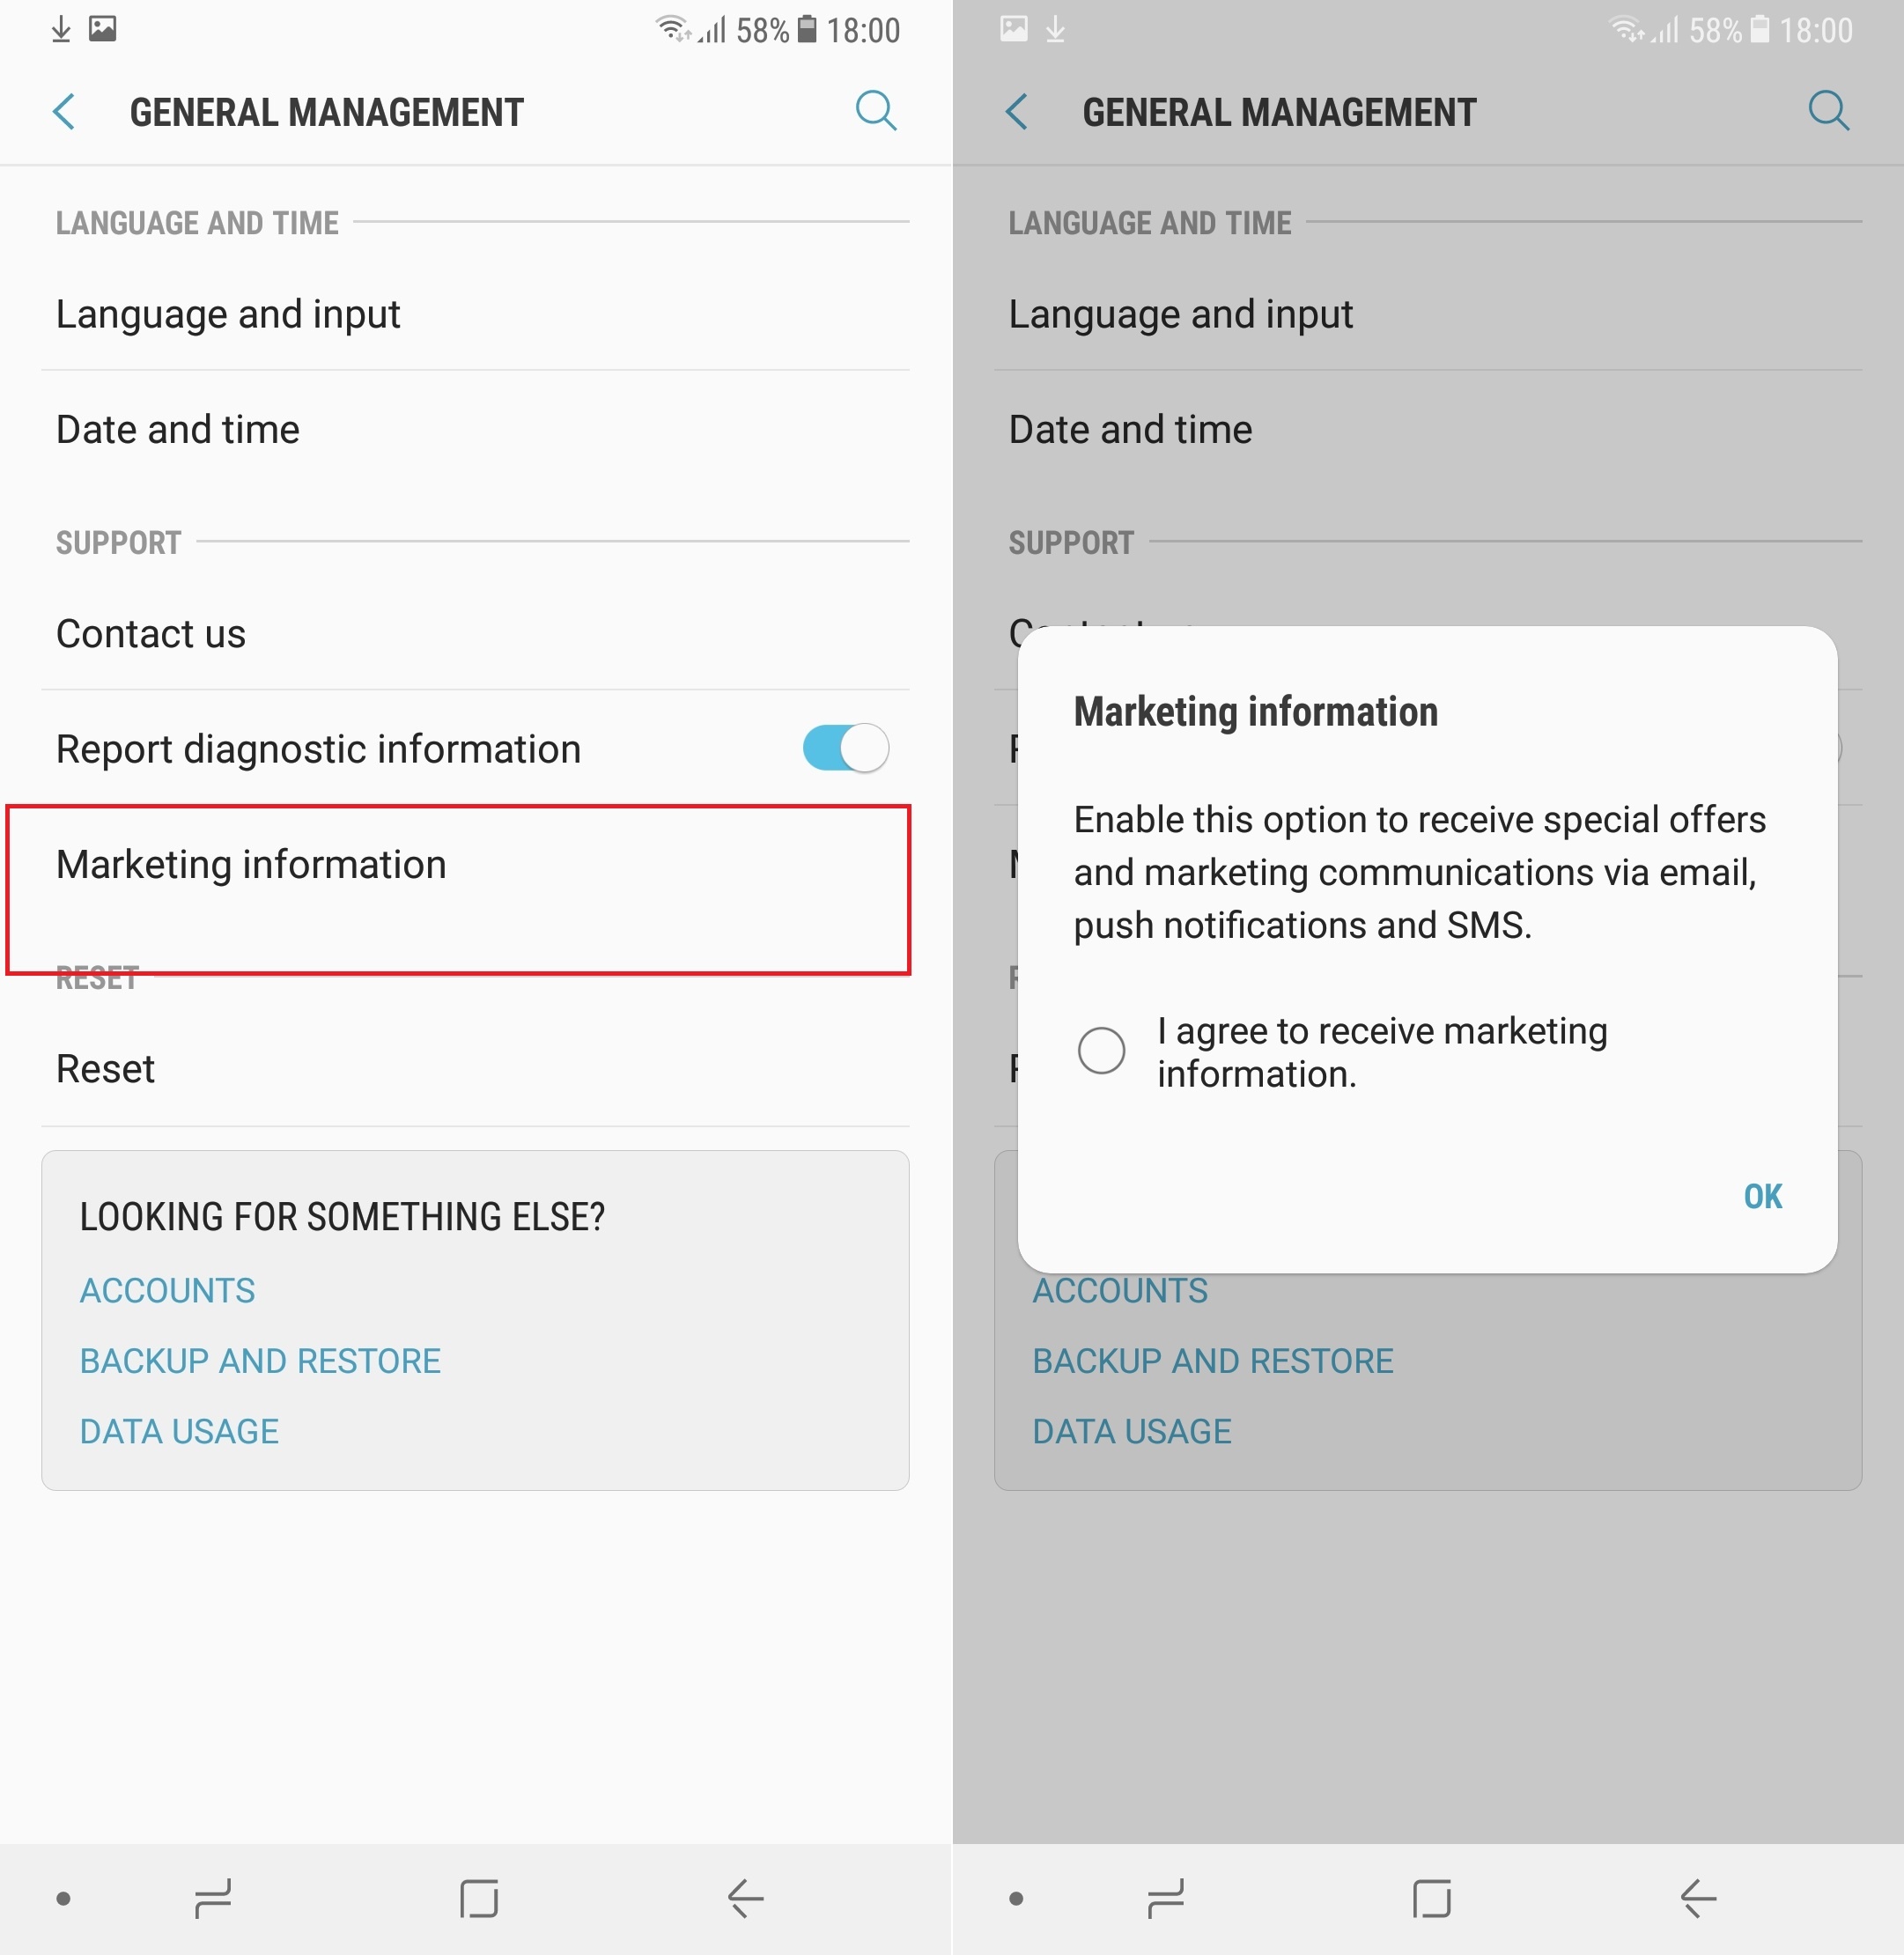
Opt out of marketing information
This is something most users miss out on during the initial setup and enroll into marketing information from Samsung, which can include anything from popups about 100 GB of free Microsoft OneDrive storage to ads inside the theme store, both as notifications and as SMS/push messages. To opt out, open the phone’s settings, go into the General management section, then tap Marketing information. On the screen that pops up, deselect the I agree to receive marketing information option.

Check out more Galaxy A8 (2018) tips here, and also see general tips for Samsung devices in our tips and tricks section.
The post Galaxy A8 (2018) Tips: 11 things to do on your shiny new A8 or A8+ appeared first on SamMobile.
from SamMobile http://ift.tt/2DMAHtQ
via
IFTTT